

If you’re an RC drift enthusiast, tuning your Futaba GYD-450 & GYD-470 gyro can really enhance your car’s performance. The Futaba GYD-450 (Now replaced byt he GYD-470 is a top choice for hobbyists looking to get serious about their RC drifting. This guide will walk you through all the steps to make sure your gyro is set up perfectly, ensuring you get the most out of your drifting sessions. This setup applied to the newer Futaba GYD-470 Gyro also.
Understanding the Basics of Your Futaba GYD-450 Gyro
The Futaba GYD-450 / GYD-470 is a small but powerful tool that helps control your RC car’s steering. It’s very light, weighing just 3.7 grams, and operates on a voltage between 4.2V and 8.4V. Before we dive into tuning, it’s important to understand that this gyro is designed specifically for RC cars, so using it for anything else might not work as expected.
Pre-Tuning Preparations
Before you start tweaking your Futaba GYD-450 or GYD-470, here’s what you need to check:
- Battery Power: Make sure your car’s battery is fully charged.
- Tools Needed: Have a mini screwdriver handy, as you’ll need it for adjustments.
Mounting Your GYD-450 / GYD-470 Gyro
Mounting the gyro correctly is crucial. You should:
- Choose a flat spot on your car’s chassis that’s away from any heat sources like the motor or battery.
- Preferably near the center line of the chassis but keep the adjustment pot accessible so you can make adjustments on the fly.
- Use the included double-sided sponge tape to stick the gyro firmly in place. Make sure it’s level and perpendicular to the direction your car travels.
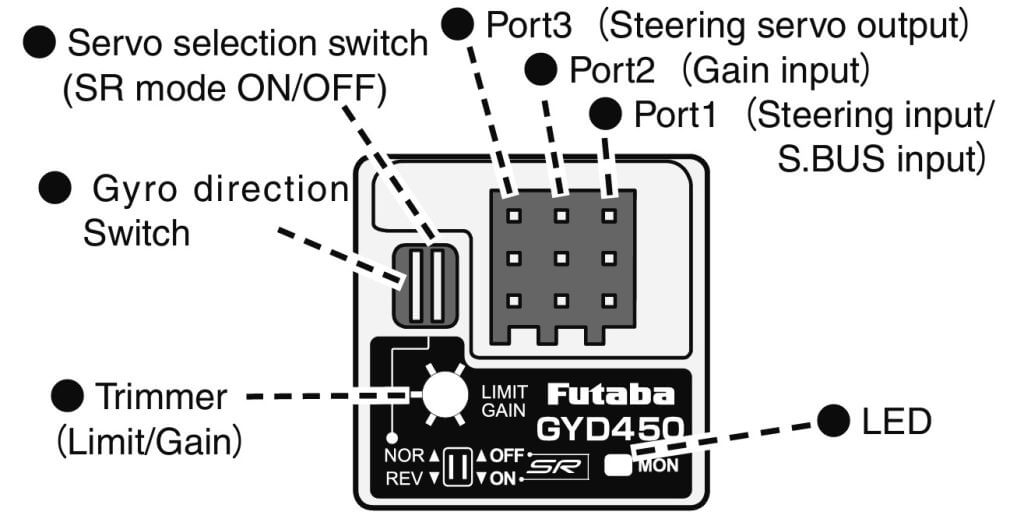
Connecting Your GYD-450 / GYD-470 to the Receiver and Servo
The Futaba GYD-450 / GYD-470 can be connected to your receiver in two ways: directly through Port 2 or via the S.BUS system through Port 1. Here’s how each method works:
- Direct Connection to the Receiver via Port 2:
- Use this port to connect the gyro directly to a channel on your receiver that manages the gyro’s sensitivity or gain.
- Adjustments to the gyro sensitivity are controlled directly through the transmitter.
- Connection Using S.BUS via Port 1:
- This method uses a single wire to transmit all channel data, simplifying wiring and improving setup cleanliness.
- It requires an S.BUS-compatible receiver and transmitter for proper functionality.
Choose the connection method that best suits your setup and preference for ease of use or advanced control.
The Connections and Functions are identical on both the Futaba GYD-450 and Futaba GYD-470 as per below.
** Please Note a common mistake is to connect both the channel 3 to port 2 of the gyro as well as SBUS to port 1. Do not do this – choose one or the other and only connect the one you want to use.

Initial Power-On and Setup
When you first turn on your Futaba GYD-450 or GYD-470, give it about 3-5 seconds to initialize. This means just letting it sit while it gets ready. Watch for:
- LED Signals: Green and red lights will indicate the gyro is setting up. If everything’s okay, you’ll see specific patterns that tell you the gyro is ready.
Setting the Limit Trimmer / End Points and Its Importance
Properly setting the limit trimmer on your Futaba GYD-450 / GYD-470 is a crucial step for ensuring optimal performance of your RC drift car. The limit trimmer adjusts the maximum range of the servo’s movement, which directly affects the steering limits and response of your car.
Here’s how to adjust the limit trimmer and why it’s important:
- How to Adjust the Limit Trimmer:
- Locate the limit trimmer on your Futaba GYD-450 / GYD-470.
- Start with the trimmer in a middle position. Turn on your RC car and transmitter. Using your transmitters steering wheel turn it all the way to the left and hold it there and then gently adjust the trimmer so that it only goes as far as the steering can mechanically without any binding. Move it slowly to observe how the range of steering servo movement changes. Now do the same when turning to the Right.
- Increase the limit to allow for wider steering angles if needed, especially useful in tight corners or if you want aggressive drifting angles. Decrease it to restrict the servo’s range for finer control and stability at high speeds.
- Importance of Setting the Limit Trimmer:
- Prevents Mechanical Binding: Properly setting the limit ensures that the servo does not push beyond the mechanical limits of your car’s steering system, which can cause binding or even damage to the steering mechanism.
- Enhances Performance: By adjusting the limit trimmer, you tailor the steering responses to suit your driving style and the demands of the track. This customization allows for smoother handling and better performance.
- Increases Longevity of Servo: Avoiding the extremes of servo motion helps prevent undue stress and wear on the servo gears, thereby extending its life.
Adjusting the limit trimmer is about finding the right balance that suits your car, the track conditions, and your driving style. It’s advisable to make incremental adjustments and test drive after each adjustment to finely tune your RC drift car’s steering capabilities.
NOTE: Every Time you make ANY changes to your steering alignment such as camber, tow or caster, you must re-set your endpoints as per above.
Tuning the Gyro Sensitivity and Modes
Adjusting the sensitivity of your Futaba GYD-450 / GYD-470 is crucial for optimizing your RC car’s response to your steering inputs, especially when drifting. The GYD-450 offers two primary modes for handling different driving conditions: NORMAL and AVCS (Angular Vector Control System).
Here’s how to adjust the sensitivity and switch between these modes:
- Sensitivity Adjustment:
- On your GYD-450 / 470, you’ll find a sensitivity trimmer. This small knob allows you to manually set the sensitivity level of the gyro. Turning the trimmer to the left decreases sensitivity, which can be useful for high-speed, stable driving. Turning it to the right increases sensitivity, enhancing the car’s responsiveness to steering adjustments, ideal for tight cornering and drifting.
- The initial setup usually starts with the sensitivity set to about 70%. This setting is a good balance for most driving conditions, but you may need to tweak it depending on your specific track and driving style.
- Switching Modes between NORMAL and AVCS:
- The Futaba GYD-450 / GYD-470 allows you to select between NORMAL and AVCS modes by using the mode switch on the device. NORMAL mode is the default setting, providing a balanced gyro effect that tries to keep the car stable but still allows for some natural drifting movement.
- AVCS mode, on the other hand, gives you a more aggressive gyro control. In this mode, the gyro works harder to maintain the car’s heading as set by your last steering input, making it easier to hold a drift or quickly correct if the car starts to spin out.
Adjusting Gain Settings Using Your Transmitter
If your transmitter has three or more channels, you can adjust the gain settings right from your remote control, which affects how sensitive the gyro is. Here’s how to do it:
- Turn the gain up to make the car more responsive, or down to make it less so.
- Experiment with different settings to see what feels best on your particular track.
Gyro Direction and Steering Adjustments
Getting the steering just right is key in drifting. After mounting your Futaba GYD-450, you’ll likely need to adjust the direction:
- Direction Adjustment: Use the gyro’s direction switch to ensure that when you turn the car left, the wheels actually go left (and vice versa).
Driving Test and Final Adjustments
After all the settings are dialed in:
- Take your car out for a test drive.
- Watch how it handles the turns and make any necessary tweaks to the gyro settings.
Maintenance Tips for Your Futaba GYD-450 / GYD-470
Keeping your gyro in top shape is important. Here are some quick tips:
- Keep it clean and free from dust.
- Check the mounting and connections regularly for any signs of wear or looseness.
Conclusion
Tuning your Futaba GYD-450 / Futaba GYD-470 can seem tricky at first, but with this guide, you’ll be able to get it set up just right. Remember, the key to great performance is in the details, so take your time and adjust everything carefully.
Further Resources
For more tips and tricks on tuning and maintaining your RC drift car, check out more posts on our blog or come in to RC Drift Qld and we can give you assistance.
If you’re in Brisbane or the Gold Coast, I’ll see you at the track!
Leave a Reply
You must be logged in to post a comment.